Mulailah

Tanpa permulaan, anda tidak akan sampai ke mana-mana.

Semangat

Semangat yang kuat mampu mengatasi apapun cobaan yang datang.

Konsisten

Lumbung emas dalam diri kamu adalah pikiran kamu. Kamu dapat menggalinya sedalam-dalamnya dan sepuas-puas yang kamu inginkan.

Pantang Menyerah

Gagal selepas usaha adalah hikmah, anda akan mendapat sesuatu yang lebih besar daripada apa yang anda sangkakan.

Be The One

Be the one is better than be the best.

Tuesday, February 7, 2012

STRUCTURE OF THE EARTH'S LITHOSPHERE


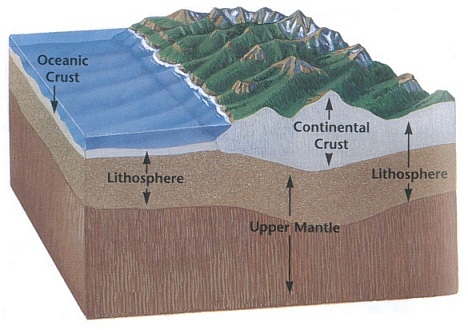
In the image to the right we see a small portion of the earth's outer layers enlarged to show more detail (click picture for a larger version).
The drawing begins at the earth's surface (sea level) and descends about 150 kilometers down. There are several layers shown, color coded brown and black, green, and reddish.
The outermost brown and black layer, above the Moho (boundary between crust and mantle) is the crust. It has two major divisions: ocean basins (black layer) composed of mafic rocks (or see primer) like basalt and gabbro, and continents (brown layer) composed of felsic rocks (or see primer) such as granite. the crust extends to a depth of about 70 km, and represents less than 0.1% of the earth's total volume.
The continent in the upper center is a continental craton. A craton is a stable continent eroded down to just above sea level. Because continental cratons are composed of light weight rock such as granite they are like a boat resting in water, neither rising nor sinking on their own. They are said to be in isostatic equilibrium. Conversely, mountains of any kind must be held up by something, like heat or a root zone, or they will sink right back into the earth.
The Moho lower boundary of the crust marks the transition from the granite and basalt of the crust to the ultramafic rocks (or see igneous primer) of the mantle below.

The outer layers of the earth are subdivided on two totally different criteria, composition and behavior, and these overlap in non-obvious ways, often leading to confusion if we don't pay attention.
Compositionally, the Moho separates the crust, composed of relatively light weight felsic and mafic rocks, from the ultramafic rocks of the mantle. The felsic and mafic rocks are analagous to the light weight slag that floated to the surface during the earth's molten stage.

Behaviorally, the outer earth layers are divided into the lithosphere and asthenosphere (see right side of enlarged drawing). The lithosphere is the cold, rigid outer layers, and is composed of the crust and the outermost portion of the mantle.
The underlying asthenosphere is all ultramafic mantle, but it is hot and plastic. The convection cells operate within the asthenosphere.

more articles about earth in here

STRUCTURE OF THE EARTH

To understand plate tectonic theory, we need to know something about the structure of the earth. To understand this structure we need to know something about igneous rocks. If you are unfamiliar with igneous rocks, there is a brief primer that in two minutes will tell you everything you need to know to get started.

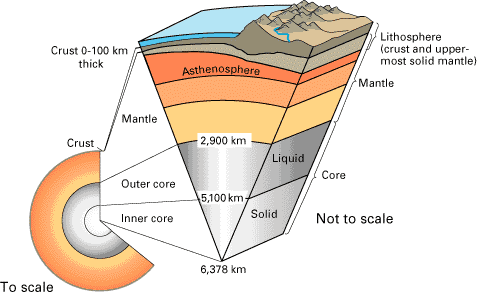
The earth is approximately 12,740 kilometers in diameter, and is stratified into layers as shown in the illustration to the right. The properties of each are:

Lithosphere - the outer rigid shell of the earth's structure, extending from the surface to about 1000 km deep (outer blue line on drawing). It consists of the crust and the upper mantle. Note how very thin the lithosphere is, comparatively thinner than an egg shell. It is divided into the crust (the outermost layer) and the very upper part of the mantle (explored under lithosphere structure).

Asthenosphere - the layer or shell below the lithosphere, about 2000 km thick. It is composed mostly of ultramafic rocks (or see igneous primer) such as peridotite and dunite that are weak and plastic, and flow slowly under stress.

Mantle - layer or shell of the earth below the lithosphere and above the core; it is about 2800 km thick, although it is subdivided into many sub-layers, including the asthenosphere and lower mantle as well as others. It is composed mostly of ultramafic rocks (or see igneous primer) such as peridotite and dunite and their metamorphic equivalents (e.g. ecologite).

Core - the central portion of the earth about 7000 km in diameter. It is composed of an iron-nickle alloy. The outer core is molten, while the inner core, even though just as hot, is a solid because of the increased pressure.

more articles about earth in here

Monday, February 6, 2012

Science & Islam


The Dark Age Myth

If there is much misunderstanding in the West about the nature of
Islam, there is also much ignorance about the debt our own culture
and civilisation owe to the Islamic world. It is a failure which stems,
I think, from the strait-jacket of history which we have inherited.
HRH Prince Charles in a speech at Oxford University,
27 October 1993
In 410 CE, Alaric, the Germanic king of the Visigoths, swept into Rome and sacked the great city in a three-day rampage. Sixty-six years later, Romulus Augustus, the last Roman emperor of the West, was deposed, and the regalia of empire was rudely despatched to Constantinople. With that, the lights went out on civilisation, and the Western world was plunged into an age of darkness – a night in which there was no scholarship, literacy or even civilised life. Only 1,000 years later did the world finally rediscover classical learning and bring the world’s night of darkness to an end with the bright new dawn of the Renaissance. Or so the story goes.
This is the myth of the Dark Ages, the idea that history and progress pretty much stopped for a millennium after the fall of Rome. The trouble is that the myth is just that, a myth. But it has been a myth so potent that it has thoroughly distorted our understanding of how civilisations emerge and how science and learning progress.
Advances in our understanding of the natural world happen when scientists absorb the latest knowledge in fields such as physics or biology, and then modify or improve it. They work rather like runners in a relay race, passing the baton of learning from one scientist to the next. Modern science, regarded as a hallmark of modern Western civilisation, achieved its place through the passing of many successive batons, which were handed to the scientists of Europe from those of the world’s non-Western cultures. These included those who lived in the cultures of Islam over a period of some 800 years from the 8th to the 16th centuries.
The fact that we know little of this is what Michael Hamilton Morgan of the New Foundation for Peace speaks of as ‘lost history’. The historian Jack Goody goes further and calls it ‘the theft of history’. It is as if the memory of an entire civilisation and its contribution to the sum of knowledge has been virtually wiped from human consciousness. Not simply in the West but in the Islamic world too, the achievements of Islamic scientists were, until recently, largely forgotten or at least neglected, except by a few diligent specialists such as Harvard University’s Abelhamid Sabra, David King, Jamil Ragep and George Saliba.
In mainstream science education in Britain – until very recently – the history of scientific progress has tended to leapfrog from the classical era of Euclid, Aristotle and Archimedes straight to the birth of the Age of Science in 16th- and 17th-century Europe, with only a cursory mention, if any, of the great swathe of Islamic science in between. In some versions of history, the ‘dark age’ only really ends, and the progress of science only really begins, with the famous conflict in the early 17th century in which Galileo confronts the Catholic Church with the assertion that the earth moves around the sun. As the world eventually acknowledges that Galileo is right, this is presented as the world-changing triumph of the light of reason over superstition. Thereafter, from the 17th century onwards, Western Europe’s scientists are set free to unlock the world’s secrets – William Harvey discovers blood circulation, Isaac Newton launches the study of physics, Robert Boyle pioneers the study of chemistry, Michael Faraday, electricity, and so on. And so we move forward into the Age of Reason and the dramatic progress of modern science.

for e-book click here


Sunday, February 5, 2012

Carl Friedrich Gauss: Mathematical Prodigy


Aprodigy is a highly talented child, usually called precocious or gifted, and almost always ahead of his peers.The German mathematician Carl Friedrich Gauss (1777–1855) was one such child. He often boasted that he could calculate before he could speak. By the ripe old age of three, before he had been taught any arithmetic, he corrected his father’s payroll by declaring “the reckoning is wrong.” A further check of the numbers proved young Carl correct.

As a ten-year-old student, Gauss was presented the following mathematical problem:What is the sum of numbers from 1 to 100? While his fellow students were frantically calculating with paper and pencil, Gauss immediately envisioned that if he spread out the numbers 1 through 50 from left to right, and the numbers 51 to 100 from right to left directly below the 1–50 numbers, each combination would add up to 101 (1 100, 2 99, 3 98, . . .). Since there were fifty sums, the answer would be 101 50 5050.To the astonishment of everyone, including the teacher, young Carl got the answer not only ahead of everyone else, but computed it entirely in his mind. He wrote out the answer on his slate, and flung it on the teacher’s desk with a defiant “There it lies.” The teacher was so impressed that he invested his own money to purchase the best available textbook on arithmetic and gave it to Gauss, stating, “He is beyond me, I can teach him nothing more.”

Indeed, Gauss became the mathematics teacher of others, and eventually went on to become one of the greatest mathematicians in history, his theories still used today in the service of science. Gauss’s desire to better understand Nature through the language of mathematics was summed up in his motto, taken from Shakespeare’s King Lear (substituting “laws” for “law”):“Thou, nature, art my goddess; to thy laws/My services are bound.”


Johann Carl Friedrich Gauss (30 April 1777 – 23 February 1855) was a German mathematician and scientist who contributed significantly to many fields, including number theory, analysis, differential geometry, geodesy, electrostatics, astronomy, and optics. Sometimes known as "the prince of mathematicians" and "greatest mathematician since antiquity", Gauss had a remarkable influence in many fields of mathematics and science and is ranked as one of history's  most influential mathematicians.

Saturday, February 4, 2012

Structure of The Sun


Astrophysicists classify the Sun as a star of average size, temperature, and brightness—a typical dwarf star just past middle age. It has a power output of about 10^26 watts and is expected to continue producing energy at that rate for another 5 billion years. The Sun is said to have a diameter of 1.4 million kilometers, about 109 times the diameter of Earth, but this is a slightly misleading statement because the Sun has no true “surface.” There is nothing hard, or definite, about the solar disk that we see; in fact, the matter that makes up the apparent surface is so rarified that we would consider it to be a vacuum here on Earth. It is more accurate to think of the Sun’s boundary as extending far out into the solar system, well beyond Earth. In studying the structure of the Sun, solar physicists divide it into four domains: the interior, the surface atmospheres, the inner corona, and the outer corona.


The Interior
The Sun’s interior domain includes the core, the radiative layer, and the convective layer. The core is the source of the Sun’s energy, the site of thermonuclear fusion. At a temperature of about 15,000,000 K, matter is in the state known as a plasma: atomic nuclei (principally protons) and electrons moving at very high speeds. Under these conditions two protons can collide, overcome their electrical repulsion, and become cemented together by the strong nuclear force. This process is known as nuclear fusion, and it results in the formation of heavier elements as well as the release of energy in the form of gamma ray photons. The energy output of the Sun’s core is so large that it would shine about 10^13 times brighter than the solar surface if we could “see” it.
Structure of The Sun


Thermonuclear Fusion
The nuclear fusion, now occurring in the core of the Sun, turns hydrogen nuclei into helium nuclei. In fact, that is how the elements heavier than hydrogen are made; the thermonuclear fusion at the core of stars can produce the first 26 elements, up to iron. The Sun, because of its relatively small mass, will go through only the first two stages of fusion, the hydrogen-helium stage and the helium-carbon stage.


Hydrogen-helium fusion can occur in more than one way, but in any case the temperature must be in the vicinity of 15 million K so that two positively charged particles will be moving fast enough to overcome their electrical repulsion when they collide. The density must be large, and the immense solar gravity compresses the gas so that it is ten times as dense as gold at the center of the Sun. If the two particles can get close enough together, the very short-range strong nuclear force will take effect and fuse them together. The most common fusion reaction in the Sun is shown in.
The proton-proton fusion reaction which occurs in the core of the sun at a temperature of about15,000,000 K

The Surface Atmospheres
The solar surface atmospheres are composed of the photosphere and the chromosphere. The photosphere is the part of the Sun that we see with our eyes—it produces most of the visible (white) light. Bubbles of hotter material well up from within the Sun, dividing the surface of the photosphere into bright granules that expand and fade in several minutes, only to be replaced by the next upwelling. The photosphere is one of the coolest layers of the Sun; its temperature is only to be replaced by the next upwelling. The photosphere is one of the coolest layers of the Sun; its temperature isonly to be replaced by the next upwelling. The photosphere is one of the coolest layers of the Sun; its temperature is only to be replaced by the next upwelling. The photosphere is one of the coolest layers of the Sun; its temperature is about 6,000 K

These periods can easily be determined by watching sunspots over several days
Photosof the Sun on four consecutivedays taken inH light. Features canbe seen to move as theSun rotates.

The Inner Corona
The inner corona is the wispy halo, extending more than a million kilometers out into space, that can be seen when the brilliant disk of the Sun is blocked by the Moon during a total eclipse. The cause of the high temperature of the corona, about 2,000,000 K, is not well understood. The corona is a large source of x-rays which do not penetrate Earth’s atmosphere. With instruments on satellites we can look at the corona in x-ray wavelengths and see many details that do not appear in visible light. From this vantage point it is clear that magnetic arches dominate the structure of the corona. Large and small magnetic active regions glow brightly at x-ray wavelengths, while open magnetic field* structures appear as gaping coronal holes. The coronal material is generally confined by closed magnetic field structures, anchored at both ends, but the open field structure of coronal holes allows the corona to escape freely to form fast, low density streams in the solar wind. This material travels outward and causes disturbances in Earth’s magnetic field. Because of their effects on Earth, we would like to be able to predict when and where coronal holes will form, but as yet we cannot do this.
Total solar eclipse ofJuly 11, 1991 as seen from BajaCalifornia

The Outer Corona
The outer corona extends to Earth and beyond. Its existence is not immediately obvious, since it cannot be seen directly; astrophysicists did not become aware of it until the 1950’s. Watching the behavior of comets, Ludwig Biermann realized in the early 1950’s that the solar corona must be expanding outward. By 1958, Eugene Parker concluded from theoretical models that particles streaming off the Sun were necessary to maintain the dynamic equilibrium of the corona. Parker’s mathematical prediction that particles streamed from the Sun at speeds of several hundred kilometers per second was verified in the early 1960s when satellites detected coronal outflow. This outflow came to be called the solar wind and its speed was accurately measured in 1962 by the Mariner 2 spacecraft bound for Venus. As Parker had predicted, this speed averaged about 400 km/s.


Friday, February 3, 2012

Cara membuat yoghrut


Ingin membuat yoghurt tapi tidak punya mesin yoghurt maker? Bisa kok...pakai saja resep di bawah ini. Selain mudah dan cepat, yoghurt yang dihasilkan juga tidak kalah dengan rasa yoghurt yang dijual di pasaran.

RESEP HOMEMADE YOGHURT
Sumber : NCC

Bahan-bahan:
* 1 liter susu (bisa susu murni, maupun yang dijual dalam kemasan)


* 200 ml yogurt tanpa rasa (plain) yang dijadikan sebagai biang


Cara Membuat :
1. Panaskan susu sampai hangat-hangat kuku.
2. Diamkan agar susu mencapai suhu ruang.
3. Lalu campurkan biang yogurt ke dalam susu.
4. Aduk rata, taruh dalam wadah tertutup.


5. Letakan wadah di tempat yang paling hangat di rumah Anda.
6. Jika cuaca tidak memungkinkan, bungkus wadah dengan handuk atau selimut tebal.
7. Biarkan selama 4 jam – 8 jam. (Semakin lama semakin asam)
8. Lalu taruh yogurt dalam kulkas dan yogurt pun siap disantap.


Tips :
* Untuk mendapatkan yogurt yang kental, dapat ditambahkan susu bubuk 150 gr yang ditambahkan pada saat memanaskan susu.
* bila ingin membuat yoghurt dengan aneka rasa, bisa mengganti susu murni dengan susu aneka rasa sesuai selera. Yoghurt yang digunakan sebagai biang juga menyesuaikan dengan rasa susunya.
* Yoghurt sangat enak bila disajikan dengan potongan buah dan disajikan saat dingin.

Thursday, February 2, 2012

Abraham Lincoln


Abraham Lincoln

Abraham Lincoln was born in Hodgenville, Kentucky, on February 12, 1809. He was the second child of Thomas and Nancy Lincoln. He was named after his grandfather. Abraham’s older sister Sarah was born in 1807. His younger brother Thomas was born in 1812, but lived only a few days.
In 1811, the Lincolns moved to Knob Creek. Abraham chopped wood, planted crops, and carried water. When he wasn’t working, he liked to explore the woods, climb the cliffs, and sit looking at the trees around him.
Lincoln’s birthplace in Kentucky
When Abraham was six, he and his sister went to school for a while. He learned to read, write, and do math. In 1816, his family moved to Indiana.
On October 5, 1818, Abraham’s mother died. The next year, Abraham’s father married a woman named Sarah Bush Johnston. She was called Sally. She had three children.
Sally soon noticed that Abraham liked to learn. She could tell he loved to read. Sometimes he walked miles to find a new book. At night, he sat close to the fire to read by its light. Sally helped Abraham continue his education. She gave him books and sent him to school when she could.
Abraham grew to be tall and strong. When he was caught up on chores at home, he worked on nearby farms to earn money. He always took a book with him.


File Pdf


replica of cabin interior, in the visitor's center

Wednesday, February 1, 2012

Tambahan Penghasilan

Cari Sampingan Juga
SEKILAS INFO PELUANG PENGHASILAN SEUMUR HIDUP DARI "WAZZUB" SELAMA ANDA MENGGUNAKAN INTERNET

"WAZZUB" Merupakan calon pesaing baru “Google” yang akan memberikan sebagian keuntungan yang di dapatkan oleh perusahaan.
“WAZZUB” sendiri baru akan meluncur tanggal 9 April 2012

BACA LOGIKANYA DIBAWAH INI, SUPAYA ANDA LEBIH PAHAM :

1 - Google


Google

Anda pasti tahu perusahaan seperti Google atau Yahoo!. Dan Anda pasti tahu juga berapa banyak yang mereka peroleh. Tidak tahu? Berikut
adalah jawabannya: Mereka mendapatkan miliaran Dollar setiap tahunnya
(Google mendapat $ 29.000.000.000 HANYA pada tahun 2010) itu berkat KITA yang menggunakan layanan mereka. Google menawarkan banyak layanan. Tapi 95% dari pendapatannya ($ 27.550.000.000) berasal dari
hanya SATU layanan saja: mesin pencari milik mereka yang terkenal, Google Search. Setiap user yang menggunakan Google Search membuat Google mendapatkan sekitar 1 $ / hari. Bayangkan jika Anda bisa mendapatkan hanya 0.001% dari penghasilan Google Search: $ 275.000/ Tahun (sekitar $ 23.000/bulan). Masalahnya adalah: Anda tidak akan mendapatkannya, karena Google menyimpan SEMUA penghasilannya untuk dirinya sendiri.

2 - Wazzub, "Revolusi Pengguna"

Pada tahun 2007, seseorang berpikir: "Kami, para pengguna membuat mereka mendapatkan miliaran dan kami tidak mendapatkan satu sen-pun.
Itu sangat menjijikkan". Maka Lahirlah WAZZUB. Wazzub adalah mesin pencari, seperti Google, yang akan memberikan Anda uang untuk merujuk anda dan orang lain ikut bergabung menjadi Membernya. Anda akan mendapatkan $ 1/bulan, SEUMUR HIDUP, untuk setiap user yang bergabung dengan Wazzub menggunakan link referral Anda. Dan Anda juga mendapatkan $ 1/bulan, SEUMUR HIDUP, setiap kali seseorang bergabung dengan kelompok Anda
(misalnya: Anda akan mendapatkan $ 1 jika teman Anda mengundang seseorang untuk bergabung, tetapi Anda juga akan mendapatkan $ 1 jika teman dari teman Anda itu mengajak seseorang untuk ikut bergabung juga, dst ..).
Wazzub Family
Anda dapat mencoba kalkulator di website kami untuk melihat bagaimana hal itu
bisa didapatkan dengan mudah. $ 4000/bulan tanpa usaha apapun.
Anda hanya perlu mengajak 5 orang untuk melakukan hal yang sama dalam
5 tingkatan. Hal ini dapat dilakukan dengan cepat & mudah hanya dengan memberitahu teman-teman Anda dan dengan mem-posting di forum di Internet seperti yang saya lakukan saat ini. $ 4000/bulan, SEUMUR HIDUP, hanya untuk memberitahu teman Anda supaya bergabung dalam program kami.
Kedengarannya luar biasa, bukan? Dan itu adalah kenyataan.

3 - Mengapa Wazzub membayar begitu banyak untuk penggunanya?

Anda mungkin bertanya-tanya mengapa Wazzub membayar Anda untuk mengajak orang untuk bergabung. Sebenarnya, jawabannya cukup
sederhana: semakin banyak pengunjung yang mereka dapatkan, semakin banyak mereka dibayar. Ingat, Google mendapat $ 1 perpengguna PERHARI. Wazzub akan membayar Anda $ 1 per pengguna PER BULAN. Jadi masih menguntungkan untuk Wazzub.

4 - Ambil keputusan Anda

Anda harus mengambil keputusan dengan sangat cepat: bergabung sekarang, mulai memberitahu teman-teman Anda dan dapatkan $ 50, $1000, $ 4000 atau bahkan lebih per bulan selama seluruh hidup Anda.
Atau menunggu dan melihat apakah WAZZUB itu benar-benar legit.

Tapi hati-hati: Wazzub tidak akan membagi hasil pendapatannya untuk anggota yang bergabung setelah 9 April 2012.

Jadi bergabung SEKARANG, GRATIS, dan ajaklah orang-orang lebih banyak lagi sebelum 9 April 2012. Setelah itu, akan terlambat. Anda
memiliki 3 bulan untuk mengubah hidup Anda.

5 - Tidak ada lagi yang perlu dikatakan, saatnya untuk mendaftar

Anda tidak harus, dan tidak perlu membayar apa-apa untuk mendaftar. Benar-benar GRATIS.
pergi ke link ini Click in here
masukkan email & data-data Anda , klik tombol "Join" dan ... hanya Itu saja. Kemudian, Anda akan segera menerima email dengan informasi penting dan link referral Anda.

6 - Beritahu semua orang tentang Wazzub

Hal penting untuk diingat adalah: semakin cepat Anda untuk mem-posting di forum, memberitahu teman-teman Anda, dll .. orang-orang akan mendaftar dengan link referral ANDA.

Wazzub sangat lah baru. Anda akan menjadi salah satu orang pertama di dunia yang tahu tentang hal ini. Jangan membuang kesempatan ini.

GUNAKAN KESEMPATAN INI DAN COBALAH MENDAFTAR, TIDAK ADA RUGINYA BAGI ANDA UNTUK MENCOBA, KARENA PROGRAM INI GRATIS TANPA BIAYA.

Sistem pembayaran akan kami informasikan pada saat launching tanggal 9 April 2012

Ikuti tautan ini untuk mendaftar : click in here

Tuesday, January 31, 2012

The Route to PCB

When it comes to turning your design or circuit into a real-life three dimensional object, there is one step that can make a big difference with it being successful. Laying out your PCB is just as important a skill as designing the circuit. In this article, I want to look at some of the key steps and the approach I take when taking the route to PCB.

I currently use a software package called PADs at ebm-papst, which in my view is a great package if you can find someone else to afford and purchase it. However, no matter what package you use, you can still
achieve the same results. So where do we start?

Assuming that I have all the footprints I need and I’m happy with the circuit drawings and components, I will print out the circuit schematics. It is important to have these at hand; you’re going to convert these line drawings into real copper. Next, I import or load up all the component footprints into my layout package.

There are two possible approaches. You can either be an auto-route person or, like me, route the entire board by hand. For designs that do not have large numbers of buses and are primarily embedded micros, hand routing is just as quick as auto-routing. I say this because I would have to check track width rules like, “Is the net set to the correct width to carry the current?” I would also go back and check that signal lines are not next to power rails or noise sources. Therefore, in my head I can do this as I route and get the best layout I want, using my brain as the auto-router and designrule checker.
Figure 1. The Route to PCB


I start by grouping the components into areas around the outside of the board. For instance, let’s say I have a switch mode power supply-all these routes end up in a jumble over on one side. So do not overlap; just place them side-by-side in a grid to get an idea of the board area required. I do this for each block of the circuit, and this is why having the schematic in front of you is useful you can see if the 100nF cap is for the power supply or needs to go next to an IC for decoupling. I move these blocks around until I can see where I want the flow or interfacing edges of each block to go until I’m ready to move on.
Figure 2. Analog

Assuming I have a PCB outline, I will create a physical representation and start placing connectors—the ones that just have to go somewhere. I glue on the connectors so I can’t accidentally move them. It is then important to check PCB size and the location of the connectors to see if they fit in the enclosure.

I then start routing the board in one of two ways. Most of my boards are two or four-layer. Regardless of the number of layers, I think about the board as a 3D object. The circuit layout can be broken down into two types: One type of layout deals more with analog circuits, having short routes between a resistor and an IC or between a few caps and regulators (Figure 2). The other type of layout is for, digital circuit with long runs of two or more routes running between multiple devices. One example would be routing a SPI bus (Figure 3).

Figure 3. Digital
I try and start with the analog circuits and lay out the components and tracks as they appear in the Figure 2: Analog circuit diagram. If you don’t have a lot of overlapping nets in a 2D drawing then it should be easy to do the same on the PCB. I will keep it all to one side of the board if I can, which allows for another circuit to sit on the other side. I have used this technique often with RPM monitoring circuits for fans with the PWM drive circuit on the other side of the board. They both have to feed to and from the microcontroller and device—in this case a fan—so it is good if they run in parallel.

For a digital layout, I will run the lines together as much as possible, but I do not try to only stay to one side of the board. I will, however, use a rule: blue = horizontal, red = vertical. The blue and red refer to the bottom and top sides of the board as it is displayed in the CAD package. By running these lines only horizontal on one side of the board and vertical on the other, it will minimize the number of board layers required.

However, there are no hard rules, and when you have a digital embedded circuit you will have both layout types to deal with. This means that I will layout each block as it fits each layout profile above. Digital and analog lines from the micro will follow a more blue/red rule until they reach the analog-type circuits. This allows me to break out the signals from the micro and keep tight and compact analog circuits ring fenced from each other.
There is, however, one very important part of the circuit I have not talked about yet—the power rails. Now it’s not hard to remember to connect power rails like your +5 or +3.3-volt lines, but people do forget about the ground or 0-volt rail. For each section of circuit or large device, I always check that I run a 0-volt trace out and connect it back. I try and use the “around the outside” rule. OK, not a great sounding rule but this means that I will have a track that runs around the entire outside of the board in a loop and then feeds into these blocks. It’s also good to highlight the whole track and see where it’s running. Can you bridge a gap (Figure 4)? The better your 0-volt connections, the more likely your board will work well!

Once complete, I then tackle the flood plan. Now I know not everyone worries about this but I do a copper flood on top and bottom connected to 0 volts. By maximizing the 0-volt tracks the flood will reach all parts of my board and I will have good connections throughout.

Figure 4. Ground Track
Finally, I will run connection and clearance design rule checks that are built into PADs to flag silly errors before generating a final export to the mechanical engineer. He will, in my case, check that there aren’t any 0603 resistors sitting under an IC when it was meant to be on the back of the board. I only made that mistake once! I then can send off my files for the board to be made. It is a good idea to be certain that all the components will fit on the board. I once worked at a place where we had a PCB mill that could drill and cut the tracks from blank sheets of copper. This was a good way to see if everything fit in the right place before spending money on prototype boards.

There are many hard and fast rules you can add to your design approach, but these simple and basic principles allow me to design a board with minimal errors and reduce my chance of a re-spin.

About the Author
Paul Clarke is a digital electronics engineer with strong software skills in assembly and C for embedded systems. At ebm-papst, he develops embedded electronics for thermal management control solutions for the air movement industry. He is responsible for the entire development cycle, from working with customers on requirement specifications to circuit and PCB design, developing the software, release of drawings, and production support.

Monday, January 30, 2012

bagaimana kacamata 3D bekerja?

terdapat 2 type kaca mata 3D yang berkembang diantaranya
1. kacamata red/green atau red/blue
umumnya kacamata ini mempunyai dua warna yang berbeda yaitu merah dan biru yang pada saat itu dikeluarkan dengan logo "RCTI" , kaca mata ini pernah populer di Indonesia saat munculnya film "Tuyul dan Mbakyul" dan "Jin dan Jun". Tetapi saya disini tidak bernostalgia dulu dengan hal masa lalu sekarang yang saya bahas disini adalah bagaimana kaca mata itu bisa bekerja.

Sewaktu kita mempelajari tentang sistem televisi penerima ada 3 komponen utama warna yang ada yaitu RGB (Red, Green and Blue / Merah, Hijau dan Biru) dari sinilah kacamata itu bekerja.
dari ketiga warna itu dapat dibentuk berjuta-juta warna yang ada dan untuk membentuk bagaimana kacamata 3D bekerja caranya pada proses editing pada film gambar tersebut dipisah pada masing-masing warna dan jarak antara warna yang satu dengan yang lainnya tidak ditumpuk menjadi satu warna tetapi ada sedikit celah sebenarnya.

karena kita hanya mempunyai 2 mata maka dua warna itu yang bekerja, disini saya memberikan contoh pada kacamata red/blue atau merah/biru. pada kacamata dengan lensa biru, lensa tersebut mereduksi cahaya biru sehingga yang terlewatkan hanya cahaya merah dan begitu juga sama dengan lensa yang lainnya, sehingga dari sini kita seakan-akan melihat dari sudut yang berbeda dari tampilan gambar pada layar. hal inilah yang membuat kita seolah-olah merasakan masuk kedalam film tersebut
3D Glasses
kelemahan kacamata ini adalah kamu tidak dapat melihat semua gambar dalam keadaan 3 dimensi karena hanya pada gambar tertentusaja yang dibuat seakan-akan 3 dimensi. Saat ini ada kacamata yang lebih baru untuk kita dapat merasakan sepenuhnya masuk kedalam dunia itu yaitu dengan sistem polar.
Red/Blue dan Red/Green

2. Kacamata Polar
kacamata ini pada prinsipnya sama dengan kacamata red/green atau red/blue tetapi disini yang menjadi pembeda bukanlah warna tetapi polarisasi yang digunakan

3D Glasses

kalau pada kacamata red/green editing bekerja untuk menyesuaikan gambar tetapi pada kondisi ini sebenarnya sama hanya saja gambar yang dihasilkan dibagi berdasarkan polarisasi atau kutub-kutubnya. dari gamar diatas dapat terlihat bagaimana kacamata 3d dengan sistem polarisasi dapat bekerja.
Polarisasi

sekian dari saya semoga pengetahuan ini dapat menambah khazanah ilmu kita semua dan juka ada kekurangan atau kritik mohon saran.